
Here are the details of the new Logic 10.3 update. Taken from the Apple release notes here:
Before updating Logic Pro X, make sure to back up the currently installed version of the Logic Pro application and your Logic Pro projects.
New in Logic Pro X 10.3
New Features and Enhancements
Support for the Touch Bar on MacBook Pro.
Track Alternatives let you create and switch between different playlists of regions and edits on a track.
Render any combination of effect plug-ins to a selection of audio using Selection-based Processing.
Share to GarageBand option allows you to remotely add new tracks to your Logic Pro project from your iPhone or iPad via iCloud.
New region editing design reveals waveform for entire audio file, or unused MIDI data, while trimming.
True stereo panning provides more control and discrete manipulation of stereo signals
Projects can now contain up to 256 busses.
Logic Pro now offers a 64-bit summing engine.
Import Music XML files.
Insert plug-ins as either stereo or dual mono on stereo tracks.
Expanded color palette offers 24 more colors to label your regions, tracks and notes.
There is now a key command Create New Track with Duplicate Settings and Content. The same action can be triggered by Command-clicking the New Track with Duplicate Settings button in the track header.
The I/O plug-in now has a Mix control.
There is a new Recording page in the preferences window, which now has the settings for Overlapping recordings, recording file type, and recording bit depth.
There are now key commands to move the locators forwards and backwards by one bar.
There is now a control for horizontal auto-zoom in the Main window, Piano Roll, Audio Track Editor and Step Editor.
There is now a key command to create a new Arrangement Marker.
There are now key commands to toggle the disclosure of the currently selected track stack, or all track stacks.
There are now key commands to create a new project alternative and to edit the current alternative.
There is now a preference setting to adjust the brightness of the backgrounds in the Tracks area.
There is now a key command to close Track Stack folders on the currently selected track.
There are now key and menu commands to apply the last fade edit to selected regions.
Key commands can now be used to apply one of up to 30 Transform User presets.
There is now a command Move Movie Region to Playhead, available as a contextual menu item and key command.
It is now possible to set the sample rate when creating IRs in the Impulse Response Utility.
There is now a key command Repeat as Alias.
Disk Space management is now fully supported on macOS Sierra.
There is now a key command Show Movie in Finder.
There is now a key command Diatonic Insert in the Score window.
There is now a Key Command for Apply Default Crossfades.
There is now an option in the Overlapping Recordings preferences to select between replacing MIDI regions, or just the content within existing regions when recording in Replace mode on MIDI tracks.
Stability and Reliability
Logic Pro no longer sometimes quits unexpectedly when:
Switching between two open projects.
You remove all the categories from the Plug-in Manager.
You choose a different Apple Loop from the same loop family inside a MIDI Take folder, and then the Take folder is flattened.
Adding compressed audio files to tracks.
Closing a project while in full screen mode.
Logic Pro no longer hangs if the Populate with Drummer Regions command is performed on songs that are 30 minutes or more in length.
Logic Pro no longer sometimes seems to hang when selecting mounted drives from the Alchemy Sources > Import Audio pop-up menu.
Performance
There is no longer a slight lag when record-enabling a track in the Mixer.
Loading EXS instruments that use compressed audio files is now considerably faster.
Logic Pro now takes less time to quit.
Logic Pro now properly sets Processing Threads to the maximum number of cores on MacBook Pro (late 2016).
Moving a marker while playing back no longer sometimes causes clicks in the audio output.
Scrolling performance in large projects with a large number of regions is improved.
Selecting the previous or next track with the Up and Down arrow keys is no longer slow with Automation view enabled.
Alchemy
Alchemy’s LFO waveshape display now updates as expected after loading an LFO preset.
Alchemy Modmaps with Y Snap set to 1/12 now correctly snaps nodes to 1/12 increments.
In Alchemy, if a sample is imported to Source A using Sample mode and then the same sample is imported to Source B, C or D using Granular mode, disabling Source A no longer leaves the other Source position stuck at 0.
A double-click is now required to edit the text below a Performance Control.
The last used folder to import audio into an Alchemy Source is now remembered after the File > Clear command has been used.
Right-Clicking Auto-assign on an Alchemy Performance Control now reliably only assigns that control.
Improves the tuning of several Alchemy presets.
Option-clicking on a curved ADSHR segment in Alchemy again immediately affects the control segment and makes the linear decay stage audible.
The post-modulation feedback ring around Alchemy’s arpeggiator pattern knob now continues to update after it has been manually adjusted.
Assigning the modwheel to control a parameter in Alchemy no longer removes the modwheel assignment in the Performance section.
Alchemy’s Spectral Editor now saves a separate undo step per source, and if there is no undo step available, the Undo button is now dimmed.
Notes being held in Alchemy while switching VA oscillator wave shapes now continue to sound as expected.
Alchemy now offers Downsample as an option for Source, Master and Multimode filters.
Changing a point in Alchemy’s Envelope Editor now properly updates the Partials display.
The Alchemy arpeggiator now offers an Input Snap setting that quantizes incoming MIDI notes to the rate when Logic Pro is running.
When an external controller is used to adjust Alchemy’s AHDSR, the curve now immediately updates visually in the plug-in.
Import of MIDI files to the Alchemy arpeggiator is improved.
It is again possible to load Alchemy .acp files from the plug-in Load file menu.
It is now possible to auto assign all ADSR Performance controls to the same envelope with one click in Alchemy.
Alchemy now displays values when adjusting grain size in increments smaller than 1 ms.
Alchemy now responds consistently to channel and polyphonic pressure.
Performing Undo after loading a Patch no longer causes instances of Alchemy that have been modified since the project was last saved to unexpectedly reset to the saved state, or to the default state if the project has never been saved.
Audio quality of Apple Loops imported into Alchemy is improved.
Alchemy’s LFO selection menu now lists the LFO number and its currently configured waveform.
The first note played into an Alchemy instance no longer sometimes causes an unexpected spike in CPU usage.
Autosave now works for Alchemy.
A scroll bar is now consistently shown in Alchemy’s Browser preset list in Simple mode.
Alchemy now loads presets that use AAZ files more quickly.
Alchemy Mod maps assigned to controls that operate in semitone values now default to snapping to 1 semitone increments when adjusted.
Alchemy sounds with the Additive Magnetic Effect modulated by Key Follow now play reliably in tune.
Changing the VA waveform from the source menu now properly resets the groups in cases where the source contains multiple groups.
Formant analysis now gives good results on samples at sample rates other than 44.1 kHz.
Logic Pro’s Quick Help system now works with Alchemy.
Controls labeled “Add FX” or “Spec FX” in Alchemy now respond to MIDI learning in the Learn page.
Accessibility
Plug-ins open in Controls View by default when Voiceover is active.
VoiceOver now announces the position of the Playhead correctly when the timeline is set to display Hours:Minutes:Seconds:Samples and SMPTE/EBU with Samples.
The Pitch Correction slider in the Audio Track Editor is now announced by VoiceOver.
The Audio Track Editor Quantize Strength slider is now announced by VoiceOver.
The Audio Track Editor Transpose Slider is now announced by VoiceOver.
Improved Accessibility to Alchemy parameters in Controls view.
Automation
Region-based automation can now be written to Apple Loops.
SMPTE Lock now applies to region based automation events.
When the Insert Silence command is used, automation to the right of the inserted area is now moved as expected even when the Move Automation preference is set to Never.
When joining two regions, MIDI draw nodes from the first region no longer are eliminated if the first node in the region is before the region start.
Deleting Pitch Bend events now reliably also deletes all associated interpolated Pitch bend events.
Splitting or joining regions with MIDI Draw CC nodes no longer sometimes causes unexpected extra CC events to be created.
Logic Pro no longer creates unneeded temporary regions if automation view is active and faders are moved while recording MIDI.
It is now possible to automate Send on and off.
The commands to create automation nodes at region borders now applies to all regions of an active track group.
It is now possible to rubber band select automation across multiple tracks.
Track automation to bypass plug-ins now continues to work correctly after the plug-in has been moved to. different slot.
MIDI Draw in the Score now properly handles regions with events on different MIDI channels.
Drummer
When a Track Stack contains a Drummer Track, you can now set the Follow feature so the Drummer track follows the other tracks in the stack.
Dragging a MIDI region onto a Drummer track and then performing Undo now recovers the deleted Drummer regions, as well as moving the MIDI region back to its original location.
Drummer regions that are followed by a MIDI region are now correctly regenerated when switching Drummer characters.
It is no longer possible to drag non-drum or percussion loops to the Drummer track.
The Junction tool now works with Drummer regions.
It is now possible to disable display of icons on Drum Machine Designer pads.
Adjusting the kick and snare pattern of a Drummer region no longer sometimes affects a region that is a copy of the region being edited.
Swing is now calculated correctly for electronic Drummers when the Half Time Kick and Snare pattern is chosen.
If a Producer Kit is loaded for an acoustic Drummer track, changing Drummer characters now loads the corresponding Producer Kit for the character.
Flex
Flex Pitch has been improved to reduce the potential for artifacts when setting notes to perfect pitch.
Apple Loops in projects with sample rates higher than 44.1 kHz now play back at the correct speed when Flex is enabled on their tracks.
Option-clicking on the Formant Shift control in the Audio Editor with Flex Pitch enabled now properly sets its value to 0.
The Flex Pitch “Set to Perfect Pitch” command now works for all selected regions.
Transients in Apple Loops are now calculated and displayed correctly in the Audio File Editor.
Undo now works correctly after editing transients in Apple Loops.
Takes/Comping
It is now possible to glue Take folders together.
The Fade tool now works on regions in open Take folders.
Right-clicking on a Take folder that contains no comps now shows only one listing for each take in the folder.
All tracks in a Phase-locked edit group now follow comp edits correctly in cases where the edit spans discontinuous comp segments.
The regions that result from unpacking a Take folder are now named correctly.
It is now possible to copy and paste Take regions.
Capture Recording now properly creates Take Folders when the Recording Preferences for MIDI are set to do so.
The Region Inspector no longer shows a non-functional Mute checkbox when a take region is selected.
Option-clicking a Takes region with the Marquee tool now selects it as expected.
Applying the key command Create New Comp during playback no longer mutes output of the track.
Selecting the menu item to Flatten Takes on a Take folder now performs the operation on all other selected Take folders as well.
Logic Pro no longer sometimes creates new tracks if the Recording > Create Takes preference enabled and MIDI is sent while recording audio.
Track Stacks
Duplicating a track stack that contains audio channel strips with default names no longer creates a track stack channel strip with the same default names as the originals.
When a selected Track Stack is Command-clicked, all tracks inside the stack are now deselected.
Shift-clicking a closed Track Stack now reliably selects all the sub-tracks it contains.
Plug-ins
Plug-in side chain menus now display full routing information for busses, as is done on channel sends.
The Feedback value in the Stereo Delay is now properly maintained if the Routing is changed from Straight to another preset and then back to Straight.
A plug-in’s Compare button now activates when a parameter is changed by a MIDI hardware controller mapped to a Smart Control.
Changing parameters in the Exciter plug-in during playback no longer causes audio artifacts.
Signal passing through a Compressor side chain set to SUM is now at the correct level.
Audio Unit plug-in windows no longer sometimes get stuck at a certain position on the screen.
If a plug-in produces latency, the help tag shown when hovering over its plug-in slot shows the amount of latency the plug-in is producing.
External mod wheel events no longer sometimes cause unintended percussion retriggers in the Vintage Organ instrument when it is in morph mode.
Timing for the ProcessMIDI() function in the Scripter plug-in has been improved.
Multi-Output Audio Unit instruments set to output to multiple mono Auxes no longer skip output 2.
When a voice is dragged from the Ultrabeat import sheet to an instrument slot, the slot now shows the name of the imported voice.
The Peak readout in the Multimeter and Level Meter now continues to work after switching from True Peak to RMS mode.
The Phase knob is now dimmed as expected in mono instances of the Phaser plug-in.
Audio Unit software instruments that support both mono and surround can now be loaded as multi-mono instruments.
Multichannel Gain and BPM Counter plug-ins now have updated user interfaces.
The Modifier MIDI plug-in can now process Program Change messages.
Reordering effects in the Vintage Clav plug-in on macOS Sierra no longer sometimes leaves the effects tiles overlapping one another.
Deselecting the Dcy checkbox for Groups in the EXS Instrument Editor now disables decay for the Group when Trigger = Key Release.
MIDI plug-ins can now remote control any automatable plug-in parameter on the same channel strip.
Scripter instances that use the Arpeggiator script now bounce in place as expected.
A list of up to five of the most recently used plug-ins now appears at the top of the plug-in menu.
The sustain pedal now works consistently when controlling the Latch button in the Arpeggiator plug-in while in Add Temporarily mode.
In the Arpeggiator there is now an option to create a region from the source material rather than the arpeggiated result.
Loading patches that contain an instance of the Bass Amp Designer plug-in no longer sometimes causes a popping noise.
If a plug-in has been renamed in the Plug-in Manager, the help tag now shows the edited name of the plug-in when hovering the pointer over it.
The stereo version of the I/O plug-in now offers an option to send and receive mid/side signals.
Pitch bend range is now adjustable in the EFM1 instrument plug-in
The Modulator MIDI plug-in now offers a 1/128 LFO rate.
Undoing the loading of a patch no longer causes samples on other Kontakt instruments to be unexpectedly reloaded.
Changing the sample rate no longer sometimes causes unexpected changes to the sound of the Flanger, Chorus, Vintage Clavinet, Retrosynth, and the Pedalboard Chorus and Flanger plug-ins.
The Plug-in Manager no longer allows duplicated custom plug-in names.
Changing the Software Instrument plug-in assigned to a track no longer causes controller data on the track to be deleted.
Space Designer can again load plug-in preset files saved to custom locations in Logic 9.
Plug-ins inserted while Logic Pro is recording now become functional when recording is stopped.
Plug-in parameters that are controlled by fader events from the Scripter plug-in now remain functional if the order of plug-ins in the channel strip is changed, or new plug-ins are inserted.
Renaming a category in the Plug-in Manager no longer causes the category to unexpectedly move to the bottom of the list.
A keyboard set to Multi in the Vintage B3 Organ Split view now maintains the setting when the view is changed to Presets or Controls and then back to Split.
The grid in Delay Designer now remains visible when an instance of the plug-in is opened a second time.
Third party Audio Unit plug-ins now display meters properly in Controls View.
Typing in values to parameters in third party Audio Unit plug-ins in Controls View now works reliably.
The Mic Position in Amp Designer is now easier to adjust without inadvertently closing the position display.
The sustain pedal now works as expected with the Vintage Clav in the Plectratone, Dulcitone and Belltone modes.
Adjusting the Attack, Hold, or Release time with the scrubber in RetroSynth or MIDI Modulator’s ENV display now reliably updates the envelope points in the display
Enabling Constant Mod in the Modulation Delay no longer causes the Delay and Modulation settings to increase.
Mixer
The New Track with Next Channel command now retains the input setting from the currently selected track.
Level meters on surround channel strips in the Mixer and Track Header no longer get stuck when playing back a stereo region.
Creating a track stack from tracks that are routed to an Aux that is already assigned to a track now properly maintains the routing to the existing Aux.
The routings of sub-tracks in a summing stack that have outputs routed outside the stack will be properly duplicated when copying the summing stack.
It is again possible to select a single Folder channel in the Mixer.
Tracks created inside a Summing Stack by clicking the + button in the Track Header are now correctly routed to the summing bus.
It is now possible to copy/paste only the plug-ins or only the sends of a channel strip.
Control-clicking a mixer channel strip no longer unexpectedly deselects multiple selected channel strips.
Busses are now listed by name rather than number when the Send or Output slot is clicked.
Bus labels in the Send and Output menus now show the assigned routing.
Busses used for track stack routing are now grouped in a sub-menu labeled with the name of the stack.
When multiple channel strips are selected, Option-clicking a fader or control on one channel will set the control to its default state on all selected channels.
It is now possible to create a new VCA when all tracks are already assigned to existing VCAs.
In cases where multiple channel strips are selected in the Mixer, but only one is selected in the track list, adjusting controls in the Track Header or Channel Strip Inspector will only affect the selected track. Adjusting controls in the Mixer will continue to affect all channel strips selected there.
Creating a surround audio track while the Patch Library is open no longer creates a mono signal path.
It is now easier to rubber-band select the bottom of channel strips in the Mixer without inadvertently moving the faders.
Software instruments can now be directly used as Side Chain inputs.
Auxes created from a surround channel strip are now configured as surround.
When assigning channel strip inputs to busses, the labels for busses that have already been assigned are now consistently displayed.
Global Tracks
The Insert Snipped Section at Playhead command now properly maintains the key signature after the inserted section in cases where the inserted section contains a different key signature.
Transients in the Beat Mapping track now display at their correct positions after the anchor position in the audio file is changed.
The Replace by Average command in the Tempo Track can now be assigned to a key command.
Tempo events with non-integer values are no longer rounded to an integer value when moved to a different time position.
The Glue tool now works on Arrangement Markers.
Editing the time signature in the LCD now changes the current time signature rather than adding a new one at the current playhead position.
The Beat Mapping track now immediately updates when an audio region’s anchor position is changed.
Groove match tracks now reliably maintain their quantization when an Arrangement marker is moved.
The Select All Following command now reliably only selects tempo events that follow the current selection.
Time signature changes now display properly in the Piano Roll and Audio Track editor.
Markers Sets can again be deleted from the Global track Marker Sets menu.
In order to reduce the accidental creation of markers, the feature that enables markers to be created by dragging an active Cycle down to the lower half of the bar ruler now requires the action start from within the Cycle range.
It is now possible to open the Key Signature editor from the Global Signatures track at low vertical zoom levels.
It is again possible to rubber-band select multiple points in the Tempo track and drag or copy them to a new position.
Select All now includes all events in open Global Tracks.
Changing the Time Signature in the LCD again inserts the new Time Signature at the bar containing the current Playhead position.
Editing
When the Select All Following command is used in an editor, markers are no longer also unexpectedly selected.
The command MIDI > Separate by Articulation ID now names the resulting tracks based on the articulation IDs if names are available for them.
MIDI recordings merged to an existing region using the Capture as Recording command no longer deselect the merged region.
It is now possible to unlock SMPTE locked events in the Piano Roll.
Adding MIDI Draw data in the Piano Roll no longer sometimes places the new point at the Playhead, instead of the clicked position.
The repeat function now works for Marquee selections, and for Time Handles in the Piano Roll.
If the playhead is within the bounds of a selected region, a Piano Roll area or window with Content Link mode enabled will consistently show the area around the playhead.
If Catch Playhead in the Piano Roll has been turned off because a region away from the Playhead was selected, it is now automatically turned back on if a region within the range of the Playhead is selected.
Clicking on the Quantize Strength or Quantize Swing slider without moving it in the Piano Roll no longer causes MIDI data to jump to quantized positions.
Notes created with the Pencil tool in the Piano Roll now match the MIDI channel of the previously created note.
The Piano Roll no longer unexpectedly scrolls vertically when toggle recording in cycle mode with drum names displayed.
If regions from both a locked and unlocked track are visible in the Piano Roll, adjusting a note from the unlocked track no longer brings up the error “This track is protected and can’t be changed.
The Piano Roll display now behaves as expected during recording when the Link button is disabled.
When a Piano Roll is opened after recording, the view now automatically positions and zooms to show the recorded content.
It is now possible to adjust position and length by samples in the Event List when Display Time is set to SMPTE/EBU with Samples and the Event List is set to display Length and position as time.
Applying quantize to SMPTE locked notes in the Event List no longer causes them to shift unexpectedly in position or length.
Setting the start times of multiple selected regions in the Event List now correctly sets the starting times.
It is again possible to use Shift-Option to set multiple selected events to the same value in the Event List.
Editing using the + or – keys to adjust the last clicked value in the Event List now reliably affects the correct field.
The Event Float window now shows SMPTE time when the Event List is set to show Event position and length as time.
When an Event Float window is open, key commands meant for other areas now work correctly.
The text tool now works in Flex Pitch view in the Audio File Editor.
Using the disclosure triangle to close a group in the Project Audio window no longer closes the disclosure triangles for all the audio files inside the group.
It is now possible to start a rubber-band selection below the lowest lane in the Step Editor.
The counter that shows the number of selected events in the Step Editor now immediately updates when the selection is changed.
Automatic Lane Sets for the Step Editor are now available in all templates.
The region header in the Audio Track editor now reliably only shows regions for he selected track.
When choosing patches in a Multi Instrument, the patch names for the currently selected bank are now properly displayed.
It is no longer possible to create objects on the Environment All Objects layer, which could lead to non-functional objects.
Export/Rendering
How plug-in side chain settings affect audio is now audible when bouncing a track in place.
Bouncing a multichannel software instrument now properly mutes all the source regions for the bounce.
When a project is exported as a MIDI file, alias regions and loops are now included.
Export Selection as MIDI File now remembers the last export location used in the current session.
Logic Pro now exports Final Cut Pro XML version 1.5 files.
Logic Pro now creates 16-bit Apple Lossless files when the PCM bounce option is set to 16-bit.
In projects that start at a position other than 1 1 1 1, exporting a section of the project now exports the correct section.
Creating an Apple Loop from a region no longer unexpectedly disables the Normalize setting in the Bounce Project dialog.
Includes several improvements when exporting MusicXML files.
Bouncing a surround mix while a stereo audio device is active now results in a surround bounce.
When Bouncing in Place to a new track, the newly created track now contains the same VCA assignment as the original.
There is now an option to export a selection as an audio file.
Bounces that include an area of silence no longer sometimes contain a loud click at the start of the silent portion.
Apple Loops can now be converted to CAF files.
Exporting Multi-output instruments that use Auxes no longer unexpectedly adds signal from the Auxes to the main track for the instrument.
Bounced regions now reliably maintain user created names, and when added to a track, the track is named for the region as expected.
When exporting tracks, regions or selections as audio files various new options allow to set up custom file names.
Import
The LCD now reliably shows the correct time signature for MIDI files that are opened directly by Logic Pro.
When a MIDI file is opened as a new Logic Pro project, the time signature information from the MIDI file is now included.
B-format surround files can now be dragged and dropped into the Impulse Response Utility.
Logic Pro can now import Final Cut Pro XML version 1.6 files.
Compressed audio files that are auto converted to PCM are now converted to the audio file recording type.
Logic Pro now properly handles AAF or OMF files that contain tracks with special characters in their names.
Music Memos files imported into a project at a sample rate higher than 44.1 kHz are now converted to the project sample rate.
Importing tracks from other projects during playback no longer causes audio tracks to stop outputting sound.
When importing a large FCPX XML file, Logic Pro now shows a progress bar.
When importing an FCPX XML file with multiple missing assets, there is now an option to Skip All Missing files.
Imported FCPX XML files no longer sometimes have a large number of extra unneeded tracks.
Improves conversion of .LSO files from previous Logic Pro versions.
Writing tempo information to audio files exported from Pro Tools no longer results in a burst of white noise.
Score
Score symbol meta events for all staves now display in Explode Polyphony view.
The contextual menu for assigning colors to notes in the Score now displays the actual color as well as its name.
Multiple Score Sets can now be simultaneously selected.
It is again possible to remove an extension from a chord symbol in the Score.
Undo now works for chord symbol changes in the Score editor.
Notes inserted into the Score with the Pencil in MIDI takes now show up immediately in the Store track view.
Manually degenerated line breaks are now maintained when the zoom level is changed.
In cases where a No line break object is placed at the end of the last region in a track, Page view for the region no longer incorrectly shows unexpected extra brackets with no staff from the end of the region to the end of the project.
It is now possible to insert score symbols to multiple selected regions by pressing Shift while dragging.
When an independent or grace note is inserted at the same position as the first non-independent note after a Clef change, the independent note is now affected by the Clef.
The Score now immediately updates to show changes in selection using the arrow keys.
Dragging the Playhead in a Score window set to linear view now snaps to the Ruler as expected.
There is now a guide line that appears to show when symbols being dragged into the Score are vertically aligned with existing symbols.
Chord grids are now shown at their correct size as they are being dragged into the Score.
The Score project setting Time Signatures: Hide All now works properly to hide user created time signatures.
Right-clicking on Text and Lyrics in the Score now brings up a contextual menu offering options to align the text, adjust fonts and set the text style.
It is now possible to drag instruments to new positions in the Score Sets window.
Time Signatures are no longer displayed too large in Pager view at zoom levels above 150%.
The score window no longer displays unexpected duplicate key signatures in certain rare cases.
Courtesy Signature changes are no longer sometimes displayed to the right of the end of the staff lines.
Manually inserted Clef signs no longer sometimes display to the right of the end of the staff lines.
Control Surfaces/MIDI hardware
Faders and buttons on EuCon control surfaces now properly update when quitting Logic Pro.
The Control Surface Install window now shows supported MIDI hardware controllers.
The Arturia KeyLab 25 is now a supported MIDI hardware device.
Logic Remote now includes access to several previously missing parameters in the MIDI Arpeggiator, EFM1, ES1, ES2, and EXS24 plug-ins.
Logic Remote now shows controls for MIDI Mono Mode and Pitch Bend Range on EFM1.
Logic Remote now shows controls for MIDI Mode and Filter Boost on ES1.
Logic Remote now shows controls for MIDI Mono Mode and Pitch Range on ES2.
Logic Remote now shows controls for MIDI Mono Mode, Pitch Range, LFO Triangle Shape and Prev/Next Instrument.
Logic Remote’s track selection arrows now update properly when tracks are dragged to new positions in Logic Pro.
Pressing Save As on Logic Remote while Logic Pro already has an open Save dialog no longer causes multiple unwanted Save dialogs to appear.
Selecting the Stereo Out channel strip in Logic Remote no longer selects an unexpected track in Logic Pro.
Video
It is now possibly to automatically scale the size of a video window by double-clicking its header.
A long click on a movie thumbnail now reveals the movie’s position.
Export Audio to Movie with the AAC format selected now works reliably after the first export.
Movies with MPEG2 or AC3 encoded audio tracks can again be loaded into Logic Pro projects.
Manually punching in and out in Replace Mode with Cycle on now erases the existing region as expected.
Synchronization
MIDI Clock is now transmitted at the correct time when Logic Pro is in Low Latency Mode.
MIDI
In cases where there are more than 64 MIDI input ports on the Physical Input, MIDI coming into port 65 or higher is no longer incorrectly routed to port 1 and up.
The timing of MIDI tracks sending MIDI externally has been improved.
Sounds/Content
The selection in the Sound Library no longer sometime unexpectedly jumps when using the arrow keys to stop through sounds for Drum Machine Designer kit pieces.
General
If the Time Ruler is set to show time, its format now reflects the Display > General > Show Time As preference setting.
It is again possible to automate plug-in parameters on tracks that are frozen in Source Only mode.
A right-click on a Marquee selection no longer unexpectedly divides the selection.
It is now possible to select multiple Alternatives in the Edit Alternatives window.
The Done button in the Project Audio’s Add Audio File dialog no longer changes to Add if some files are selected and then removed from the list of files to be added.
The state of individual disclosure triangles in the Inspectors are now maintained if the Inspector is hidden and then shown again.
The SMPTE time shown in the LCD display now properly matches the SMPTE time shown in the Tempo Editor and Tempo Operations window.
The Record Ready buttons in the Tracks area now reliably blink in sync with the corresponding buttons on the Mixer.
The options shown when pressing the Export button in the toolbar now match those shown when choosing File > Export from the main menu.
A separate zoom memory is now maintained for each window in cases where multiple windows of the same type are open.
If a folder that contains a single track is selected in the Tracks area, editors that have content-link enabled now show the contents of the track.
Dragging a track to a position next to a summing stack no longer sometimes incorrectly places it inside the summing stack.
Packing tracks that are inside a stack into a folder no longer creates an unneeded copy of the main track of the stack inside the folder.
When a Main window is closed, the Snap Regions to Relative Value vs. Snap Regions to Absolute Value setting is now maintained when a new Main window is opened.
The settings chosen in the Notes Crossing Split Point dialog, the Paste on Multiple Tracks dialog, and the Set All Tracks to Write dialog now persist after relaunching Logic Pro.
A marquee selection that starts at the left edge of a MIDI region, and splits a note, now properly triggers the Notes Crossing Split Point dialog.
The labels for tick marks in the Time ruler now follow the Division format setting.
Using the Fade tool on a track assigned to a phase locked editing group now applies the fade to all tracks in the group.
Capture Recording now properly merges with existing regions when the Project Recording setting for Cycle mode is set to Merge.
Deleting a track no longer also deletes Auxes that were added to the project with the track as part of a patch, if the Auxes have been assigned to tracks in the project.
Undoing the creation of a Drum Machine Designer instance now works correctly.
The MIDI region transpose setting is no longer unexpectedly reset to 0 after creating an overlapping MIDI recording in Merge mode.
Canceling the division of a MIDI region by Marquee selection no longer sometimes causes the region to be deleted.
It is again possible to toggle the Metronome click on and off during audio recording when the Metronome is in simple mode.
The Fade tool now works reliably to create fade-outs on grouped tracks regardless of the zoom level.
The correct order of tracks is now reliably maintained when recording multiple passes of several tracks in cycle mode with the Create Tracks or Create Tracks and Mute recording option.
It is now possible to load an alternative or backup by double-clicking it in the Select Alternative and Backup dialog.
Performing Undo after using Repeat in the Main window now maintains the region selection.
Values in the Region Inspector can again be set to their defaults by highlighting and deleting them, and then pressing Return.
Snap to zero crossings now applies when audio regions are divided by cutting with the Scissors tool, clicking on a Marquee selection, double-clicking a Marquee selection, or Region trim.
When record-replacing audio in cycle mode, the region to the right of the cycle area is no longer sometimes selected when recording is stopped.
Performing undo after dragging a plug-in to a different channel strip no longer also undoes the last parameter change applied to a plug-in.
MIDI regions created by manually punching in on top of an existing region in replace mode now play back as expected.
The Apple Loop variation drop-down menu no longer sometimes shows unrelated loops with similar names.
Regions moved by using the Move to original record position command no longer sometimes overlap other regions if No Overlap mode is active.
Replace mode is now automatically deactivated if the Replace button is removed from the Control Bar.
It is now possible to open a Project settings window while a Preferences window is already open.
The key commands to zoom individual tracks now apply to all selected tracks.
Data is now placed at the correct position when the Paste at Original Position command is used in projects that start at positions other than 1 1 1 1.
It is now possible to copy/paste Group settings.
Undo is now possible after performing the Name Tracks by Region Name command.
It is no longer possible to drag the Marquee selection to a point earlier than the project start.
A region copied from a position earlier than 1 1 1 1 now is placed as expected at the position chosen.
The Remove Overlaps command no longer fails to work in certain rare cases.
Copying a region to the left of a Take folder no longer sometimes causes the Take folder to unexpectedly be deleted when No Overlap mode is active.
It is no longer possible to inadvertently change the lengths of regions inside a closed Track Stack.
The Project Management > Cleanup command no longer removes audio files that belong to other Project Alternatives.
When duplicating a track with its content, the new track now contains copies of the original regions instead of aliases.
The Play from Selection key command now responds to selected Flex pitched notes in an audio region.
Zoom to fit key commands now work properly when used on a marquee selected area.
When splitting a region with Clip Length on that contains MIDI CC data that is all to the left side of the split, the new region to the right of the split point now includes a MIDI CC message of the correct value to ensure it plays back the same as before the split.
Crossfades can now be applied to multiple selected regions by swiping from right to left.
Fade in and Fade outs can now be applied to multiple selected regions on the same track with the Fade Tool.
Undoing the creation of an Audio track no longer sometimes leads to the unexpected selection of a track inside a closed stack.
Using the Record repeat key command no longer sometimes causing recently recorded regions to be deleted if the track volume is adjusted during recording.
Dividing an audio region in which the region Anchor is not placed at the beginning no longer sometimes causes an unexpected gap between the two resulting regions.
It is again possible to set the audio input device to “None”
Gluing interleaved surround regions no longer results in a mono file.
It is now possible to navigate the options in the Startup dialog using the down and up arrow keys.
It is now possible to set a default configuration for the Track Header.
When Select Unused is chosen in the Audio File Browser, deleting the files only deletes files that are not used in any other project Alternatives. Files used by an Alternative are removed from the current Alternative’s Audio File Browser, but are left on the hard drive.
The Option key can now be used to access the Loop tool when track automation is visible.
The Recent Projects list in the file selector now shows projects saved to iCloud.
Zoom to Fit now works properly when track automation is visible
Plug-ins can now be inserted while playing when Quick Punch-In is active.
Automatically generated crossfades no longer disappear when adjusting the left region border.
Pickup Clock now moves note events to the proper position after the left corner of the region has been changed.
The Musical Typing window no longer closes when Command – W is pressed while another window has key focus.
Catch is now disabled when making a Marquee selection.
When regions are grabbed in the tracks area, the help tag now shows the number of regions selected.
A long click on the border of a region no longer creates an unexpected Undo step.
Loops played in the Loop Browser now play at their original tempos when there are no regions in the tracks area and the sequencer is stopped.
The Musical Typing Keyboard now works when Flex Pitch is enabled in the Audio Track Editor.
Pressing the Option key while using momentum scrolling no longer causes the view to zoom.
Help tags now display assigned key commands when hovering over control buttons.
Control-clicking a Solo button in the Track Header now activates Solo Safe as expected.
The cursor for a tool set in one window no longer sometimes persists when the focus is changed to a different window.
When the Drag mode is set to X-Fade, dragging regions from the Project Audio or All Files browsers now sets the X-fade as expected.
SMPTE-locked markers now reliably maintain their positions when the frame rate is changed.
Merging looped MIDI regions no longer leads to extra MIDI notes in cases where the looped region does not end at least one clock tick before the start of the next bar.
Mixer height in the Main Window is now reliably saved in Screensets.
Tools whose key commands include the Command key modifier now switch correctly to the previous tool when the key command combination is released.
The contextual menu item Remove Fades now correctly removes fades of the same type from all selected regions.
The Toggle Zoom to fit selection or All Contents key command now works was expected with selected Track Stack containers.
Auto-zoomed tracks no longer grow in size after automation view is enabled and then disabled.
The Solo tool now works properly with Force Touch track pads.
The effect of changes made to the region gain while in play will now be heard without having to start and stop playback
Looped regions can now be dragged by long-clicking on either the region or one of the loops.
 c) muting them will not stop them from being exported which can make the resulting AAF package a bit cumbersome. However, one way to exclude them is to turn the related track off, and to do that you may need to configure the track header in order to see the track on/off button. So control click on any track header and choose ‘Configure Track Header’. Then you will be able to see an on/off button for each track.
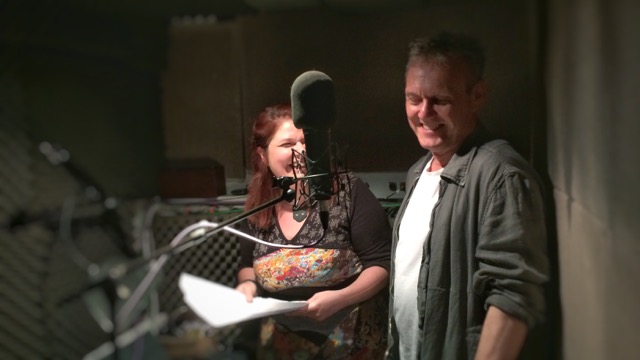


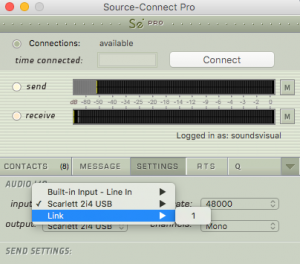


 ecently completed several long intense recording sessions using Source Connect Now to hook up with a London Soho dubbing studio to record the voiceovers for a whole set of big Christmas TV ads. The voiceover was in our voice booth here at Sounds Visual in Bath and the client and engineer were in London to direct the session. The backing music was piped down for the artist to voice over, and after 90 minutes and many scripts later I have to say that it really is a very impressive and viable alternative to ISDN.
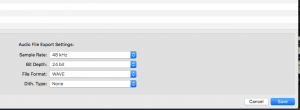
 depending on your broadband speed. I recorded the voiceovers locally here at 24bit and then transferred the files after the session. You can use the included ‘recorder’ option to record the session up to 16 minutes at a time and download in WAV format.