A few handy tips for exporting a Logic Project in the AAF format for import into other DAWs like Pro Tools.
Often when doing voiceover and ADR sessions here at the Sounds Visual studio in Bath, we are working with Post Production studios working in Pro Tools; so being able to supply them with an AAF file to import the session into their DAW is really handy. So..how to do it…
First if you have tracks that you don’t want or need to include in your AAF export, (like FX tracks, pops and timecode etc) muting them will not stop them from being exported which can make the resulting AAF package a bit cumbersome. However, one way to exclude them is to turn the related track off, and to do that you may need to configure the track header in order to see the track on/off button. So control click on any track header and choose ‘Configure Track Header’. Then you will be able to see an on/off button for each track.
After you have organised things so you have just the tracks you need to export left turned ‘on’, go to file and come down to ‘export’ & ‘Project as AAF file’.
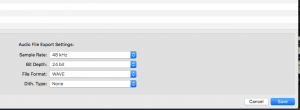
Then you will get some options including whether to save 24 bit or 16 bit files and the audio file typ
e. I find it’s less confusing at this stage to create a new folder to place the AAF file in. Actually when you export the project you will get 1 AAF file and then a sepa
rate folder containing the audio files.
AAF – a very handy and effective way to share your Logic project with Pro Tools users, and of course vice versa.
So here’s the problem. The producer is in London , but the voiceover artist is in Bath. In a remote session, how can the producer hear the voiceover being recorded at the same time as watching the film in sync with the studio in Bath? And direct the session with talkback in the normal way…? That would be handy…
Solution: With Source Connect Pro’s RTS feature. Source Elements Website The two studios don’t even have to be using the same DAW, for example it works perfectly with one studio using Logic X and the other Pro Tools. The DAW must support ReWire – and the necessary ReWire files are automatically installed when you run the Source Connect installer.
Here are some tips to setting up Source Connect RTS in Logic X.
Step 1: If you haven’t done so already – quit Logic and install Source Connect Pro.
Step 2: Start up Logic and Source Connect Pro. (Standalone)
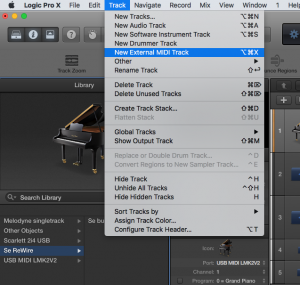
Step 3. To setup the ‘ReWire’ element, create a new External Midi Track, and then with that track selected go into the library and select ‘SE ReWire’
Step 4: If you now connect Source Connect to a studio with RTS capability you should now be able to instantiate RTS by either clicking on SEND or RECEIVE in the RTS options on the Source Connect Panel.
If you want to control the session, then you choose SEND and the other studio selects RECEIVE. Then when you start your transport in Logic – the other studio will slave to you.
Step 5: Troubleshooting. Make sure the sample rate and frame rate for your project are the same as the other studio otherwise RTS won’t work. Turn off any count in (pre-roll) for recording. If Logic is slaving – i.e. in receive mode, make sure that the project end marker is extended far enough to be out of the way.
Using Source Connect Link
In the example above the studio in Bath wants to send the following audio to the producer’s studio in London:
The Voiceover Artist mic
Playback of recorded audio for review
Talkback from the Bath studio engineer
But probably not the guide track with the dialogue and FX on it as that will be on the same film as the studio in London has.
This is easily achieved using Source Connect Link. You can think of Source Connect Link as a router that sits before the main Source Connect plugin and allows you to choose which audio in Logic is sent to the remote studio.
Step 1: Create a mono audio track. (I’m going to work this example in mono as that is all that is needed here)
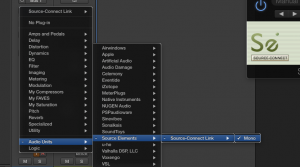
Step 2: Insert the Source Connect Link plugin as an Audio Effect.
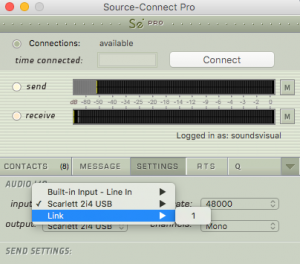
Step 3: Look at the Source Connect Link interface and note the ID number. Here it is ID 1.
Step 4: Take a look at the settings tab on the main Source Connect plugin. On the ‘input’ dropdown menu you should now see a Link option and the ID number.
Step 5. Back in Logic, go back to back to the channel strip with the Source Connect Link plugin, and set the input to an unused bus – say bus 1. Now – everything that you route to bus 1 will be sent to Source Connect – and therefore to the remote studio. Anything like the guide track that you don’t want to send – keep away from bus 1! See pic. Bus 1 then routes out to the main outputs of Logic, so the voiceover artist and studio hear the audio as normal. Same with the talkback mic; route this to bus 1, and then you are not only talking back to the artist but also to the remote studio.
(And for ease of use here’s a tip: set up a controller assignment to operate the mute on the talkback channel with a sustain pedal – that way you can press the sustain pedal to speak, leaving your hands free to edit etc) See below for an explainer video.
This website uses cookies to improve your experience. We'll assume you're ok with this, but you can opt-out if you wish.AcceptRead More
Privacy & Cookies Policy
Privacy Overview
This website uses cookies to improve your experience while you navigate through the website. Out of these, the cookies that are categorized as necessary are stored on your browser as they are essential for the working of basic functionalities of the website. We also use third-party cookies that help us analyze and understand how you use this website. These cookies will be stored in your browser only with your consent. You also have the option to opt-out of these cookies. But opting out of some of these cookies may affect your browsing experience.
Necessary cookies are absolutely essential for the website to function properly. This category only includes cookies that ensures basic functionalities and security features of the website. These cookies do not store any personal information.
Any cookies that may not be particularly necessary for the website to function and is used specifically to collect user personal data via analytics, ads, other embedded contents are termed as non-necessary cookies. It is mandatory to procure user consent prior to running these cookies on your website.

 c) muting them will not stop them from being exported which can make the resulting AAF package a bit cumbersome. However, one way to exclude them is to turn the related track off, and to do that you may need to configure the track header in order to see the track on/off button. So control click on any track header and choose ‘Configure Track Header’. Then you will be able to see an on/off button for each track.