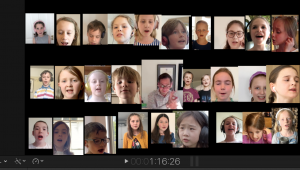
The coronavirus lockdown has forced us all to find new ways of doing things, but also to stop doing some of the things we love. Singing in a choir or group might well be one of those, and it can be an uplifting experience for young and old that has many positive well-being benefits. However the chances of attending choir practise in person any time soon seems unlikely. So here are a few tips I learnt recording Bath Abbey’s Children’s Choir ‘The Melody Makers’ with their Director Shean Bowers, as we recently set about getting the children singing together again.
You can see the finished result of our recording of Offenbach’s Can Can in the YouTube video above. This was created with 28 members of the choir all recording their parts at home. The first thing to point out this is not a live recording with everyone dialling in on something like Zoom, this is what is known as a multitrack recording, where every part has its own track, it’s own unique audio file recorded by each choir member in their own time at home. The videos are then sent in to be mixed together to form a choir.
So what’s the process?
1. Create The Guide Video
Each member needs to sing along to the same guide track – and preferably not just an audio guide, but a visual guide of the conductor conducting the choir. So that’s the first thing to create.
In this example, the choir director videoed himself playing the piano accompaniment, and then while playing back this video through headphones on one device, he faced the camera on another device and videoed himself conducting the piano accompaniment with his usual prompts and encouragement for the children to follow. I can’t stress how important getting this right is. With people singing in acoustically dead environments like bedrooms and living rooms with headphones on, they may need lots of positive encouragement and guiding to get them singing out loud and proud.
We now have one video of the piano accompaniment, and another video of the conductor conducting. We need to sync the two videos together to create one video guide to send to the choir…
2. Syncing video…manually
Because our conductor has conducted in time to the original piano part we recorded, he will be perfectly in time, so long as they both start at the same time. What we need is an obvious moment to align both videos. Anything clear and distinctive will work. So for example the piano accompaniment might have a few bars introduction and the conductor might have counted the choir in to their start point. Just find that point in the piano accompaniment, hopefully if you look at the waveform of the audio it will obvious where that is. Now slide your conductor video along until his or her hand movement aligns with that moment. The rest of the video will now be in sync. On your video editor, learn the keyboard shortcuts to nudge clips back and forth a frame at a time to make it easier to align things perfectly.
You could simplify the process and avoid having to sync two videos at this stage, and have the piano player nod and gesture to help cue the choir rather than conduct. Or you could get the conductor to record their conducting without using headphones and have the camera pick up the sound of the piano accompaniment. However, I prefer to be able to control the balance of the piano and conductor with 2 separate videos. Keep in mind that when you come to mix the final performance you are going to lose the conductor’s voice audio and will just have the piano accompaniment to mix with the choir. So keep track of all the videos with clear titles/ labels. It’s worth getting the hang of syncing videos together as you’re going to be doing a lot of it!

To mix the 2 videos together I used Final Cut Pro but you can use pretty much any video editing programme and there are various free ones available.
If you have a difficult piece that some members struggle with, or are learning a new work, it might pay to make a guide video with a vocal part(s) too. It creates another step in the process, but it’s just a question of sending the guide video to the vocalist(s) and then mixing their videos with the original guide – to create a guide video with vocals!
3. Recording the choir
Send the newly created video guide to the choir members and ask them to play it back on a device (laptop, tablet, phone etc) with headphones (we only want the sound of their voice not the guide) and at the same time use another device to video themselves singing their part.
4. Recording tips for the choir
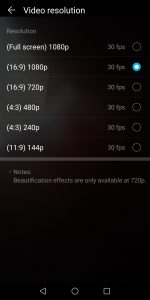
- Use the video app on your phone. No need to record in 4k ( in fact please don’t record in 4k as it makes the files sizes huge. HD or less is fine. See note below.
- The audio recording of modern cameras is surprisingly good. If you have options to record the audio uncompressed then even better.
- No need to get super close to the camera, a good arms length away or more is fine
- Don’t edit or adjust the videos just send the raw footage once happy with a take
- Try and label the file with your name and the name of the piece before sending.
- For big files use a free file sending service like wetransfer.com
- Record in a quiet fairly dry room like a living room or bedroom NOT in the bathroom!
- Try recording with one headphone or ear bud – it can make it easier to hear yourself and the accompaniment

To change the video settings on your phone you might have to go to the video app itself or via phone settings (iphone).


5. Mixing it together
As you receive lots of video files it’s easy to lose track of things, so stay super organised and use folders to keep it tidy and label files clearly as they come in.
Back in the video editor, I had the guide video in place and as the video files came in I assembled them in sync with the guide and resized them so I could fit all the member’s faces on the screen.
Once all the videos are in place you could adjust and balance the levels of audio, panning etc inside your video editor, but as I am a Logic Pro user, I exported the audio out of Final Cut using XML and imported it into Logic. That gave me separate audio tracks for each choir member, the conductor’s voice and the piano accompaniment as well as the movie for reference. I muted the original audio guide track and dropped in the original piano recording and lined it up in sync.

Now with all the choir voices in Logic on separate tracks I was able to do a little or as much tweaking and editing as I wanted. One of the pieces was quite demanding and I used Logic’s flextime to adjust the occasional tuning and timing errors. I balanced the audio levels of the choir, removed any unwanted low end and noises, and then added a nice Audio Damage Hall Reverb to bring the sound to life. Once mixed, the audio was exported or ‘bounced’ down to a single stereo file. Then, back in Final Cut I imported and sync’d the newly mastered audio track to the guide track. Finally and don’t forget this part….mute or completely turn down the audio on all the original video clips. Your virtual choir should now be ready to export and upload to YouTube.

If you would like to discuss a virtual choir or band recording, contact Jonathan on jono@soundsvisual.com.
